Warning: the precision machined edges of MeltonCraft CPVC column components can be extremely sharp. Use of appropriate personal protection equipment is required: wear gloves when handling the product, wear a dust mask when cutting the product, and always wear eye protection.
Use of polyurethane adhesive, such as Gorilla Glue®, Loctite® PL Premium® Adhesive, Christy’s™ Clear PVC Pipe Cement (or other clear PVC cement), or similar products is recommended. Always observe adhesive manufacturer’s instructions.
Assembly is easiest with pneumatic or electric pin-nailers. These should recess the head of the pin nails far enough that only a minor touch-up is necessary (touch-up with caulk prior to painting.)
 |
 |
 |
||
| 1) Measure overall opening from floor to beam or soffit (must have structural pressure-treated post or lally column for load support.) | 2) Install blocking around load bearing post (use pressure treated lumber.) Final width of blocking must be same width as inside of column. | 3) Install blocking around center and top of post to match step 2 (center blocking is optional.) Blocking may be attached to deck/soffit instead of post if necessary. | ||
 |
 |
 |
||
| 4) Trim shaft pieces at least ¼” shorter than opening height (from step 1). Trim ONLY from the bottom—top end is marked. | 5) Lay 3 panels flat and apply adhesive to center joints. | 6) Assemble three panels as shown. | ||
 |
 |
 |
||
| 7) Using finish nails, assemble three panels together. Observe joint diagram on reverse to determine correct nail placement. | 8) Place the partially assembled (three panels) column around post and blocking. | 9) Apply adhesive to fourth panel and assemble to shaft. Pin-nail in place, nailing as per joint diagram on reverse. | ||
 |
 |
 |
||
| 10) Screw or nail column to blocking ONLY ON THE BOTTOM. Do not attach at center or top (to allow for expansion). | 11) Apply adhesive to mitered edges of base moulding (standard base is 9¼” tall) and assemble around bottom of column shaft. | 12) Fasten joints on base with pin-nails. | ||
 |
 |
 |
||
| 13) The TOP of the shaft should NOT be fastened to the blocking, and there should be at least ¼” gap to allow expansion (see step 4). | 14) There are TWO methods of attaching the cap. First, apply adhesive to mitered edges of cap moulding (7¼” tall) and assemble around shaft and pin-nail joints. | 15) Option 1: Attach cap to soffit with construction adhesive and toenail to soffit. DO NOT ATTACH cap to column shaft if the cap is flush with soffit (to allow expansion).* | ||
 |
 |
 |
||
| 16) Option 2: Leave ¼” expansion room above cap, and pin-nail the cap to the column. Be sure the pin-nails DO NOT reach the blocking inside!* | 17) Caulk edges of base, cap, and nail holes. | 18) Clean surface of column with cleaner recommended by the paint manufacturer. Paint with 2 coats of acrylic latex paint. |
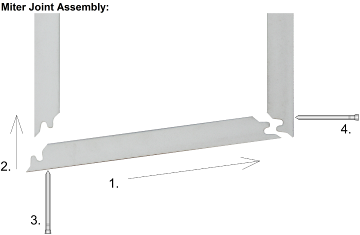
Please note the correct assembly of the mitered joint shown at the left. Nails MUST be installed only in the edges shown (3 and 4). Installing on the other edges may result in open seams.
1) Glue both joint edges; slide first joint together
2) Push second joint closed
3) Nail this joint first
4) Nail this joint second
Notes:
Panels are marked “TOP” — trim from the bottom only.
Cap and base pieces are also marked as “CAP or “BASE”
Only use non-corrosive fasteners — galvanized, stainless steel, etc.
Always follow glue and paint manufacturer’s instructions.
*Column must not be allowed to collect water, debris, etc. If the top of the column extends beyond the soffit/beam, the cap must be flashed with lead, copper, aluminum, etc. to prevent entry of water or foreign materials.